
What You Need to Make an AI UGC Video
Here, AI UGC means AI-generated advertising in the style of creator content. A believable result depends on more than a convincing face: the lighting, hand movements, packaging, and edit all need to feel like parts of the same moment.
Prepare a clear product photo, its name, and a few relevant facts. For perfume, those might be the fragrance notes; for skincare, how to apply it; for an accessory, its size, material, or a useful design detail.
| Stage | Tool | What you'll create |
|---|---|---|
| Script and rough scene | ChatGPT | A short story, setting, and composition |
| Main character image | Nano Banana 2 through ElevenLabs | A detailed source image for the avatar |
| Storyboard | ChatGPT, with optional refinement in Nano Banana | Consistent stills of the same character and product |
| Talking scenes | HeyGen | A speaking character generated from a photo and text |
| Product actions | Veo 3.1 Lite through ElevenLabs | Short product shots |
| Product voiceover | ElevenLabs | The same voice used by the avatar |
| Editing | Canva or CapCut | A complete video with consistent sound and clear cuts |
ElevenLabs serves several roles here: I use Nano Banana for images, Veo for video, and its speech tools for voiceover. Keeping those stages in one interface is convenient, but check which models and export settings are available in your account.
Step 1: Write the Script and Plan Each Shot
Decide what the character will say and what the viewer will see at the same time. For a short ad, choose one recognizable situation, such as getting ready to go out, a morning routine, or using a product while working.
In this example, she has changed her outfit several times but has already chosen her perfume. That creates a natural opening and a reason to introduce the product without a long sales pitch.
| Scene | Visual | Script |
|---|---|---|
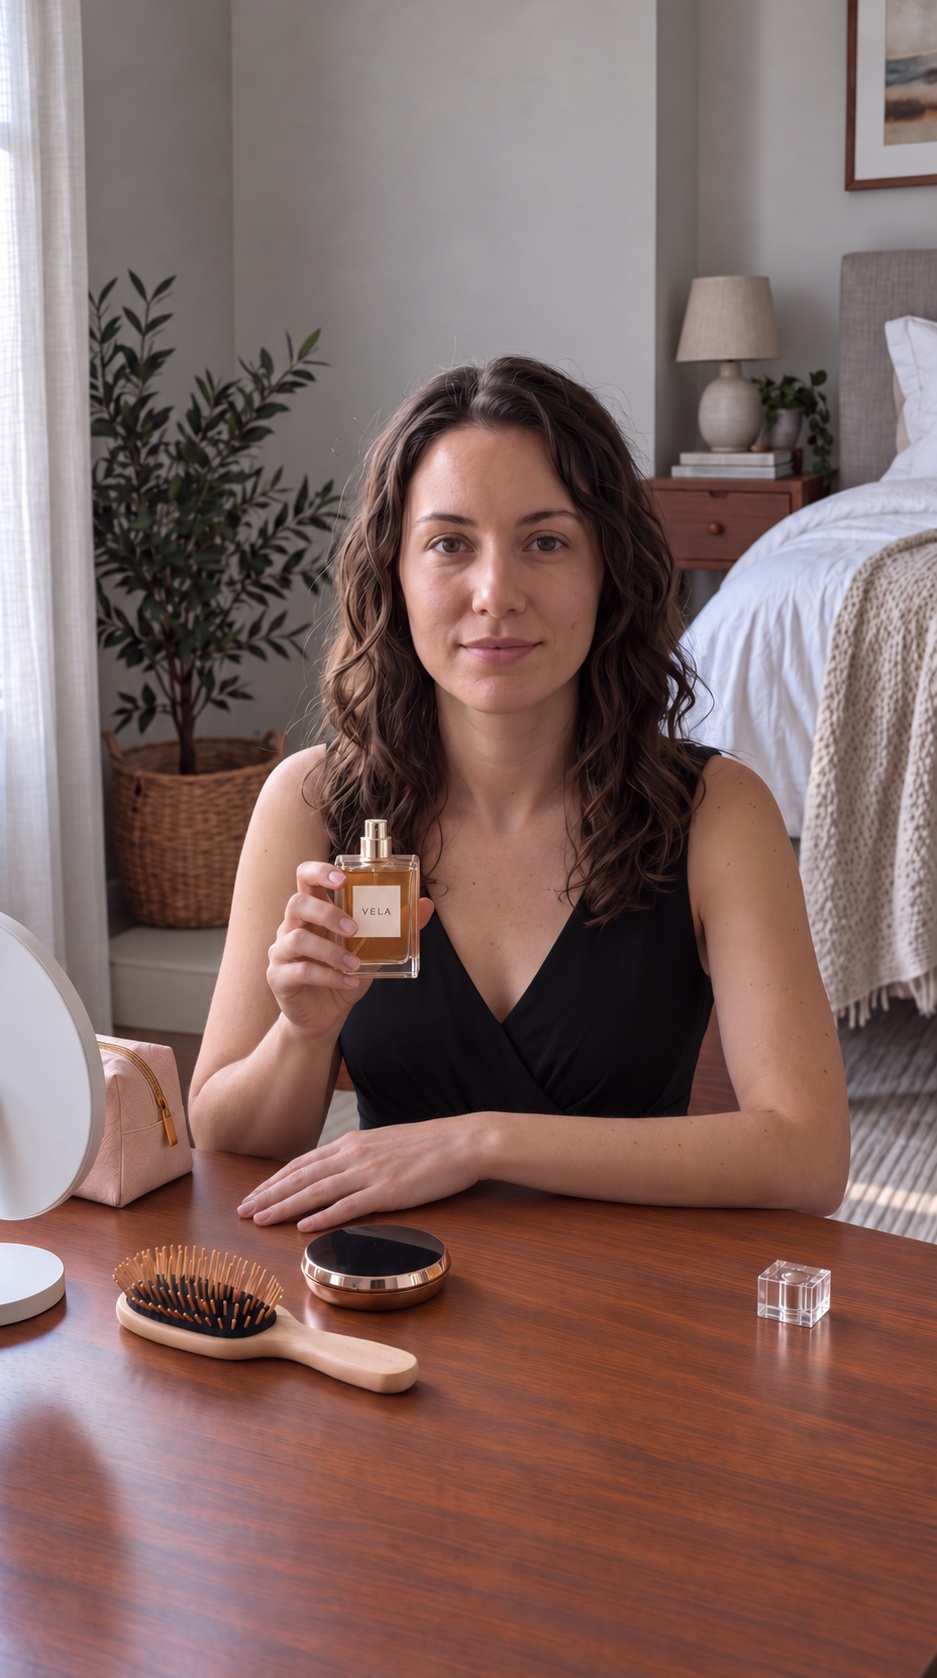
| 1. Opening | Medium shot. She looks into the camera; the capped bottle sits on the table. | “I've changed my outfit three times, but the perfume was an easy choice. Tonight, it's VELA.” |
| 2. Application | A close shot of her hands as she sprays her wrist. | “A little on my wrist, and I'm almost ready to go.” |
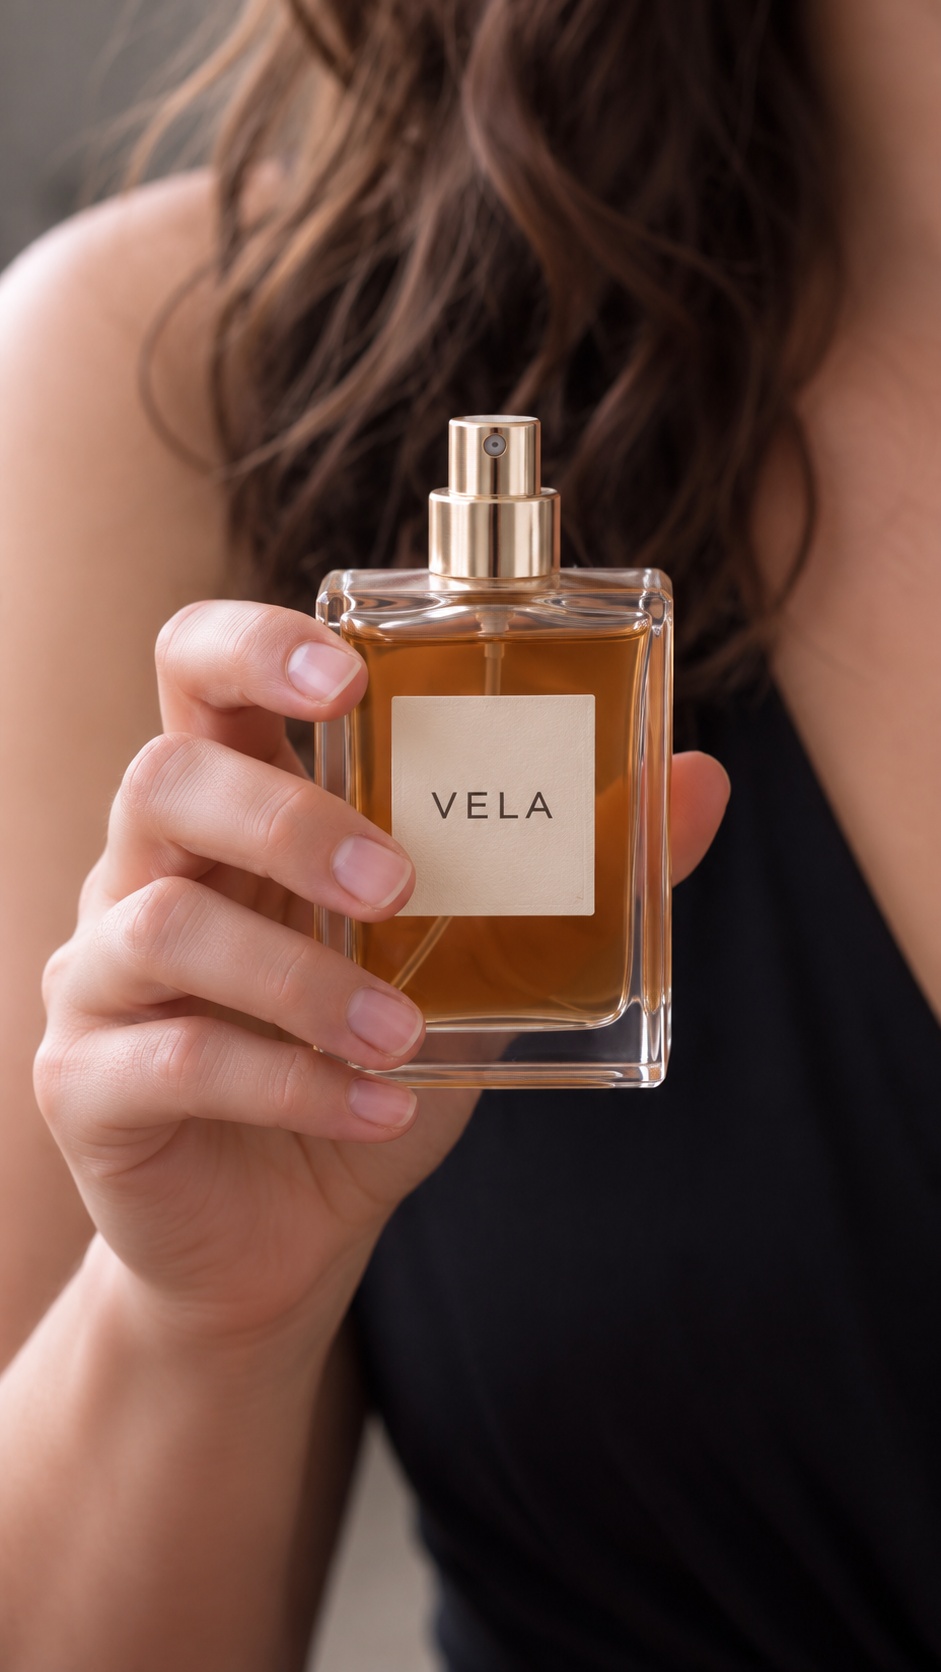
| 3. Product | Close-up of the uncapped bottle in her hand. | “It starts with pear and bergamot, then settles into a warmer cedar note.” |
| 4. Recommendation | Back to the medium shot, with the uncapped bottle already in her hand. | “If you like fresh scents with a woody side, this is one to try.” |
The avatar delivers the opening and closing lines on camera. During the two middle scenes, only her hands and the product are visible, so a voiceover using the same voice is enough—there are no visible lips to synchronize.
Notice what the edit leaves out: picking up the bottle and removing its cap happen between shots. The viewer moves directly from the introduction to the application, which makes it easier to connect a HeyGen talking scene with a separate Veo product shot.
For your own product, keep the same structure: a reason to use it → the action → a useful detail → a short recommendation. Use verified product information for the claims in the script; the packaging photo alone cannot tell the model what a product does.
Step 2: Build the Scene, Then Create the Avatar's Source Photo
Start with a Rough Scene in ChatGPT
At this stage, composition matters more than perfect skin detail. Establish the camera height and the positions of the person, product, and a few everyday objects; the setting should look like somewhere a creator could actually record the video.
For VELA, I chose a wooden dressing table near a window, with a closed powder compact, a hairbrush, a makeup pouch, and a tabletop mirror. Those props support the getting-ready story, while their sizes relative to the hand, character, and table need to follow believable scale and perspective.
The prompts below are adaptable templates, except for the main portrait prompt, which is reproduced exactly as used. Replace the product name, character, and setting with details that fit your ad.
Rough-scene prompt. Attach your product photo:
Read prompt
Create a realistic vertical 9:16 smartphone-style UGC scene using the attached product photo as the exact packaging reference. An adult woman is seated at a walnut dressing table, getting ready for an evening out. The camera is at her eye level, facing her directly. The capped perfume bottle stands on the table within easy reach, at a realistic palm-height scale.

Use ordinary neutral daylight from a window on the left, light everyday makeup and a believable lived-in bedroom. Add only a few naturally placed props: a closed powder compact, a wooden hairbrush, a small makeup pouch and a tabletop mirror with its opaque back facing the camera. Keep the tabletop continuing beyond the bottom edge. No studio lighting, glossy beauty retouching or oversized props.
Revise the draft for a specific reason: the camera is too high, the pouch blocks the bottle, or the table edge creates an awkward crop. Changing the setting, pose, lighting, and face all at once makes it harder to tell which adjustment improved the image.
Save a Separate Background Without the Person
Once the setting works, ask ChatGPT to remove the character and reconstruct the areas behind them. This gives you a background reference you can use to generate a fresh character in Nano Banana while keeping the surroundings.
Read prompt
Edit the approved scene into an empty background reference. Remove the woman completely, including her hair, hands, clothing and shadows. Reconstruct the background and tabletop naturally.

Keep the same camera position, neutral window daylight, colors, furniture and product. Preserve the capped perfume bottle, closed compact, hairbrush, mirror and makeup pouch at exactly the same realistic sizes and positions. No people, reflections of people, new objects or text. The continuous tabletop extends beyond the bottom and side edges. Vertical 9:16.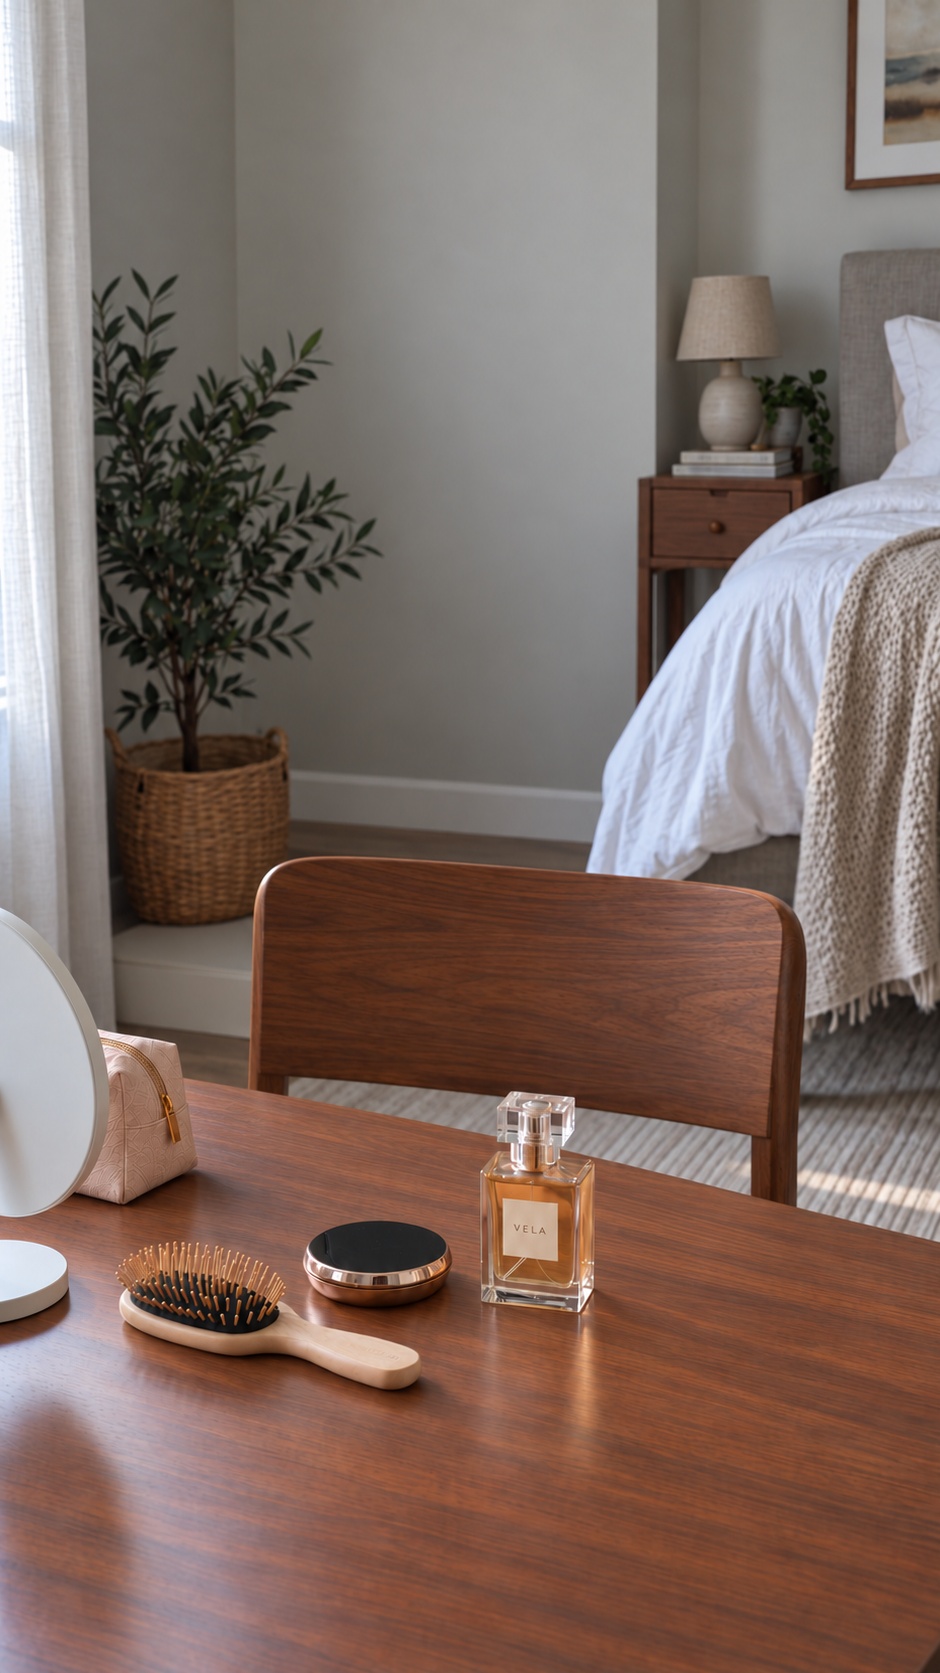
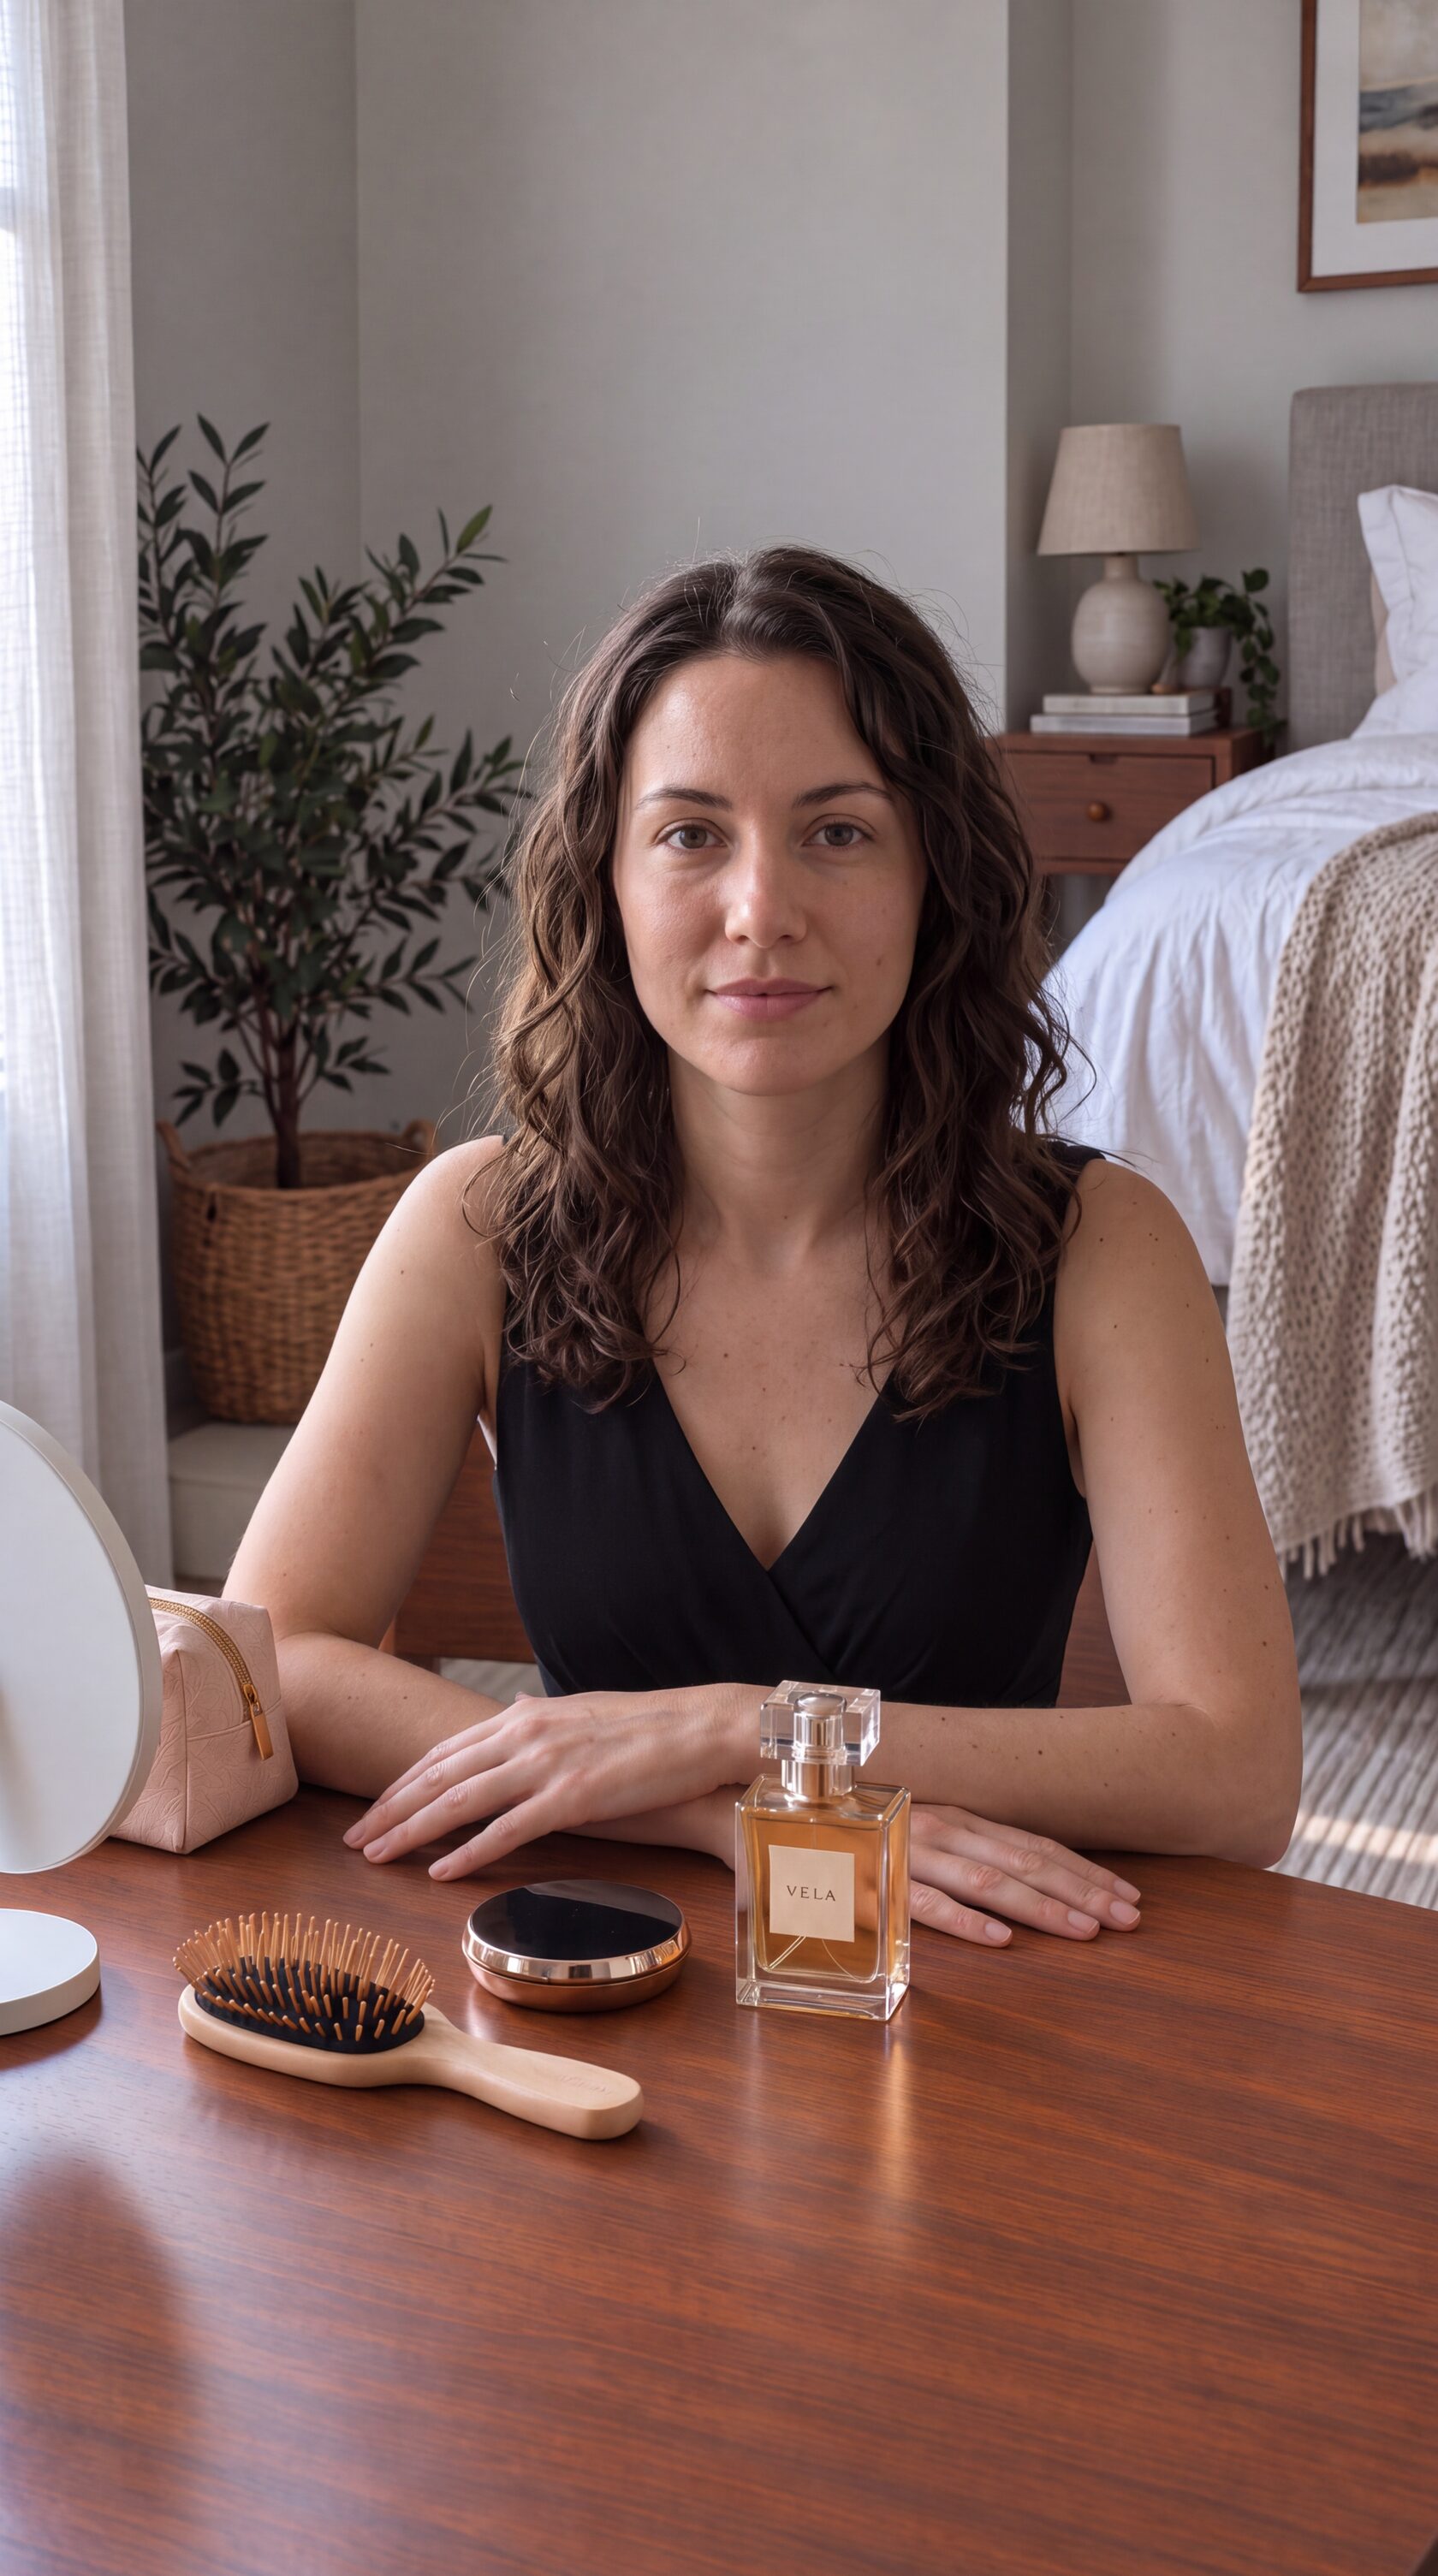
The empty background and the final Nano Banana 2 portrait in the same setting.
Generate the Main Portrait with Nano Banana 2
Open image generation in ElevenLabs, select Nano Banana 2, and attach the background as an image reference. For this example, I supplied only the background and generated the woman from scratch; another option is to add a person reference and explicitly ask the model to preserve their appearance.
The full prompt below is for a background-only reference and a newly generated character. If you also attach a person reference, replace the opening instructions about a NEW woman and no face reference with: “Use reference 1 for the setting and reference 2 for the same person. Preserve their facial identity, hair, and skin tone; keep the setting and product consistent with reference 1.” Adjust the character description as well if it conflicts with that reference.
Choose a vertical 9:16 composition and 4K if available. This image will become the source for your HeyGen avatar, so the face needs enough detail, and the hands should already be in a comfortable, stable pose.
The exact prompt used for the main VELA portrait:
Read the full portrait prompt
Create one realistic, unfiltered home UGC portrait of a NEW adult woman, generated entirely from scratch. The single attached image is ONLY a reference for the bedroom, walnut dressing table, objects, neutral colors and imperfect daylight. There is no person reference and no face to copy.

Seat an attractive, approachable woman around 28–33 behind the table. Shoulder-length softly wavy dark brown hair, a few loose strands; simple black V-neck evening dress with a tasteful neckline, light everyday makeup, no earrings. She faces the camera directly with a gentle closed-mouth expression ready to speak. Both forearms rest comfortably on the tabletop, hands empty, fingers naturally relaxed with five correct fingers per hand. The small CLOSED VELA perfume bottle remains standing on the table in front of her, not held. Real adult human proportions; bottle is approximately palm-height.

The camera is on a phone stand at the seated woman's EYE HEIGHT, optical axis level and horizontal, straight across at her face, NOT looking down. Vertical waist-up medium shot with both hands and product visible, naturally balanced headroom. Keep the tabletop continuing beyond the bottom of frame, no front table edge or drawer fronts. Reconstruct perspective for this eye-level portrait instead of inheriting any downward viewpoint from the empty background.

Match the reference's ORDINARY NEUTRAL DAYLIGHT: mildly overcast light through the existing left window, gently brighter on the near cheek and darker on the far cheek, soft normal shadows under the eyes, nose and chin. Bedside lamp OFF. Muted neutral-gray walls, natural brown walnut and neutral skin; softly cooler shadows. Background less evenly lit, but face clearly visible. No golden-hour glow, warm orange beauty grade, beauty fill, ring-light reflections, rim lighting, studio softboxes or staged cinematic backlight.

Skin in sharp photographic focus with irregular fine pores at normal portrait scale, tiny natural tonal variations, light under-eye texture and a few subtle ordinary imperfections. Cheeks mostly matte with very restrained broad daylight sheen, skin texture visible through highlights. Preserve an appealing natural appearance; no plastic smoothing, glossy highlighter, beauty-filter blur, stamped pores or aggressive oversharpening. Normal phone-camera depth of field with recognizable surroundings rather than creamy portrait-mode blur.

Preserve the reference's bedroom, plant at back left, curtain/window at left, bed and nightstand at right, switched-off lamp, books, picture, chair. Preserve the clear rectangular glass VELA bottle, cream label reading "VELA", amber liquid and CLEAR SQUARE CAP. Keep closed round compact, wooden hairbrush, mirror with WHITE OPAQUE BACK facing us and pink makeup pouch partly behind it, at realistic sizes and relative positions. No hair claw clip, extra props, extra products, people, subtitles, overlays or watermark. One believable phone-on-stand photo, 9:16, native 4K.
The useful instructions are specific: eye-level framing, ordinary daylight, restrained skin shine, and natural texture. “Make it realistic” was not enough in the early attempts—the lighting looked too polished, and the face looked overly smooth.
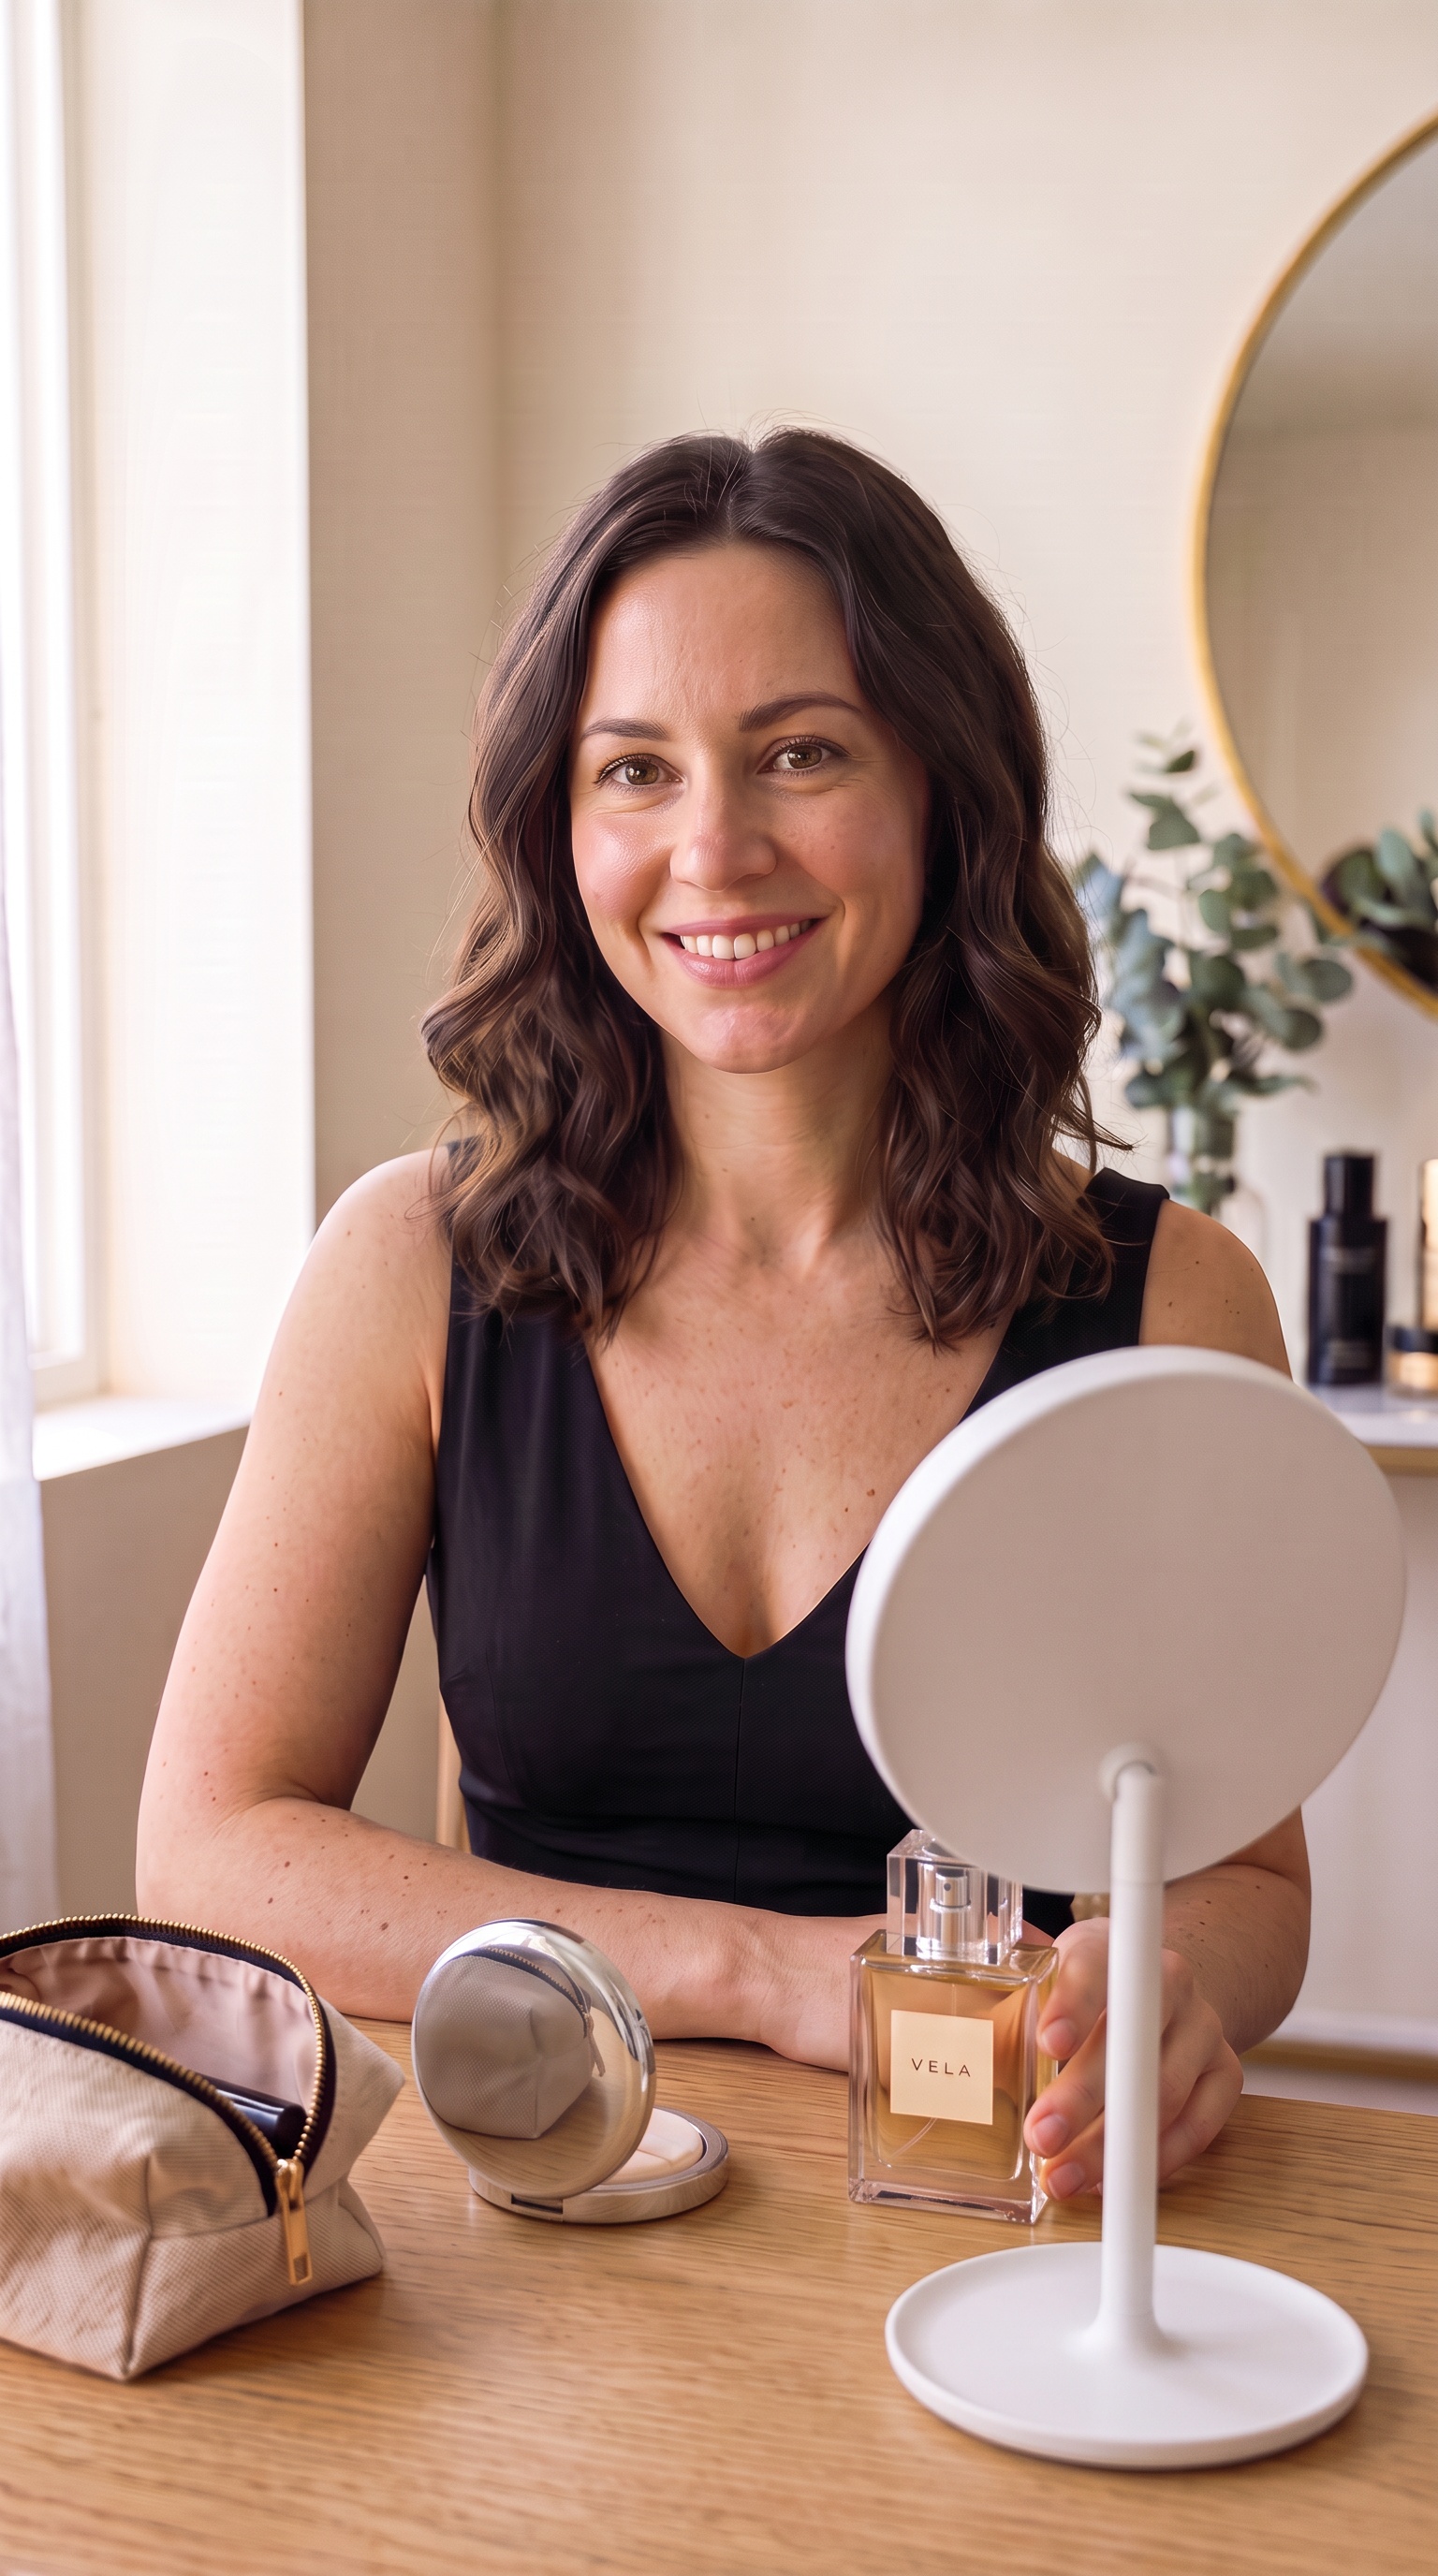
An early attempt with artificial-looking shine and the accepted portrait. These are successive scene iterations, not a controlled comparison of models.
Before moving to HeyGen, check five things: a natural-looking face, a direct gaze, correct fingers, readable packaging, and realistic object sizes. A 4K image can preserve good detail, but extra resolution does not fix bad anatomy or unsuitable lighting.
For more image-editing examples, see the guide to editing photos with Nano Banana.
Step 3: Create Four Consistent Storyboard Images
Use the accepted portrait as the common source for the other shots. Generating each image independently can change the face, outfit, bottle, or props, even when the written descriptions are similar.
In this project, Nano Banana 2 produced the main portrait, while the additional storyboard stills were created by editing images in ChatGPT. If a particular still needs more detail, you can refine it in Nano Banana using the same references.
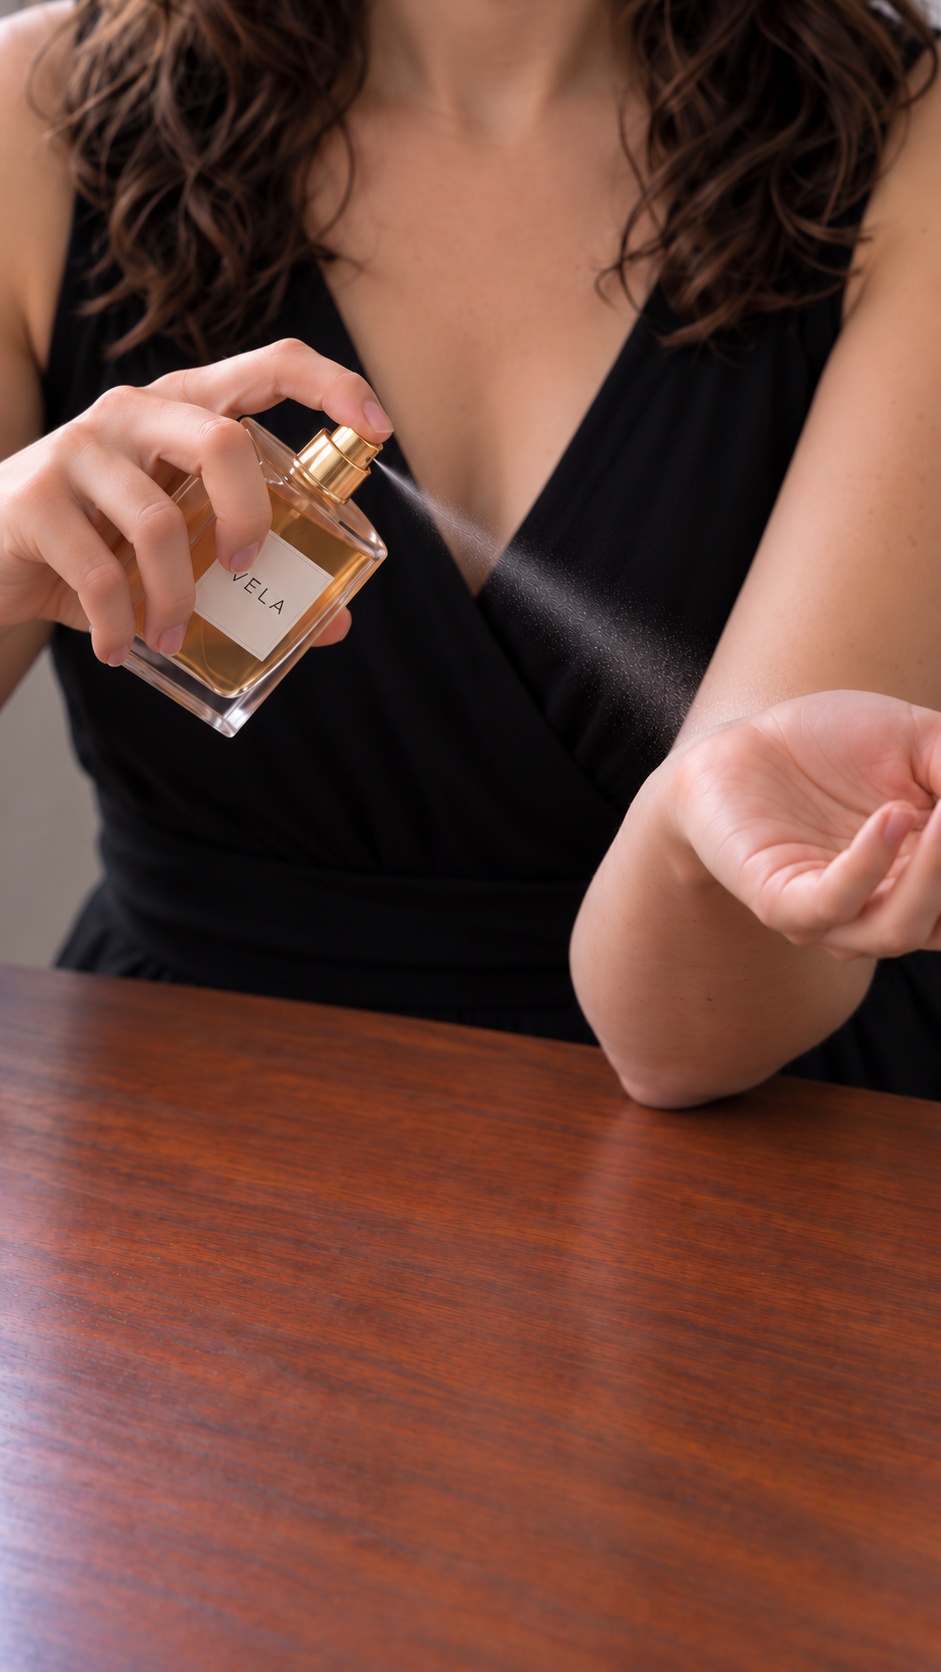
Four connected shots: bottle on the table → wrist spray → bottle close-up → medium shot with the bottle in her hand.
A useful production order is to create the second medium shot first, with the uncapped bottle already in her hand, then use it as a reference for the product inserts. That gives the hand position and packaging a shared visual source.
Final medium-shot template. Attach the main portrait:
Read prompt
Edit the supplied approved portrait. Keep the SAME woman, facial identity, natural skin texture, hair, black dress, eye-level camera, neutral daylight and all background objects at the same sizes and positions.

Change only her right arm pose and the product state. The same VELA bottle is now UNCAPPED and held upright in her anatomical RIGHT hand, at viewer-left, in front of her lower chest. The label faces the camera. Keep its glass shape, amber liquid, cream label, silver atomizer and realistic size. Fingers gently hold the sides; the index finger stays away from the pump. Her left forearm rests on the table. The clear square cap stands base-down at far viewer-right; the bottle's original spot is empty. Same full vertical composition, no zoom or beauty retouching.
Wrist-application still. Use the accepted portrait and the new uncapped-bottle image as references:
Read prompt
Create a close product-action still consistent with the supplied approved images. Show the SAME woman's hands, the SAME uncapped VELA bottle and her opposite wrist above the same walnut tabletop. Keep the same dress, neutral window daylight, skin tone, product scale and background color.

Her anatomical right hand holds the bottle securely, index finger resting naturally on the atomizer. The nozzle points toward the inside of her left wrist at a short believable distance. Capture the moment BEFORE pressing: no mist yet. Keep both hands and the complete bottle inside the vertical 9:16 frame. Her face and mouth remain outside the crop. Correct anatomy, stable grip, no extra fingers, enlarged props or new objects.
Bottle close-up template. Attach the medium shot with the bottle in her hand:
Read prompt
Take a tight photographic crop of this exact supplied scene, centered on the VELA bottle and the woman's anatomical RIGHT hand. Preserve the existing hand, grip, bottle geometry, cream label, silver atomizer, amber liquid and daylight.

Vertical 9:16 close-up: the entire bottle and hand fit inside with comfortable margins; bottle height is about half the frame. Keep her face, mouth and chin outside the top edge. Background is the same softly out-of-focus black dress. The tabletop props are outside the crop, not enlarged or moved. Bottle remains uncapped and upright, label facing camera, index finger away from the spray button. No new objects or changed grip.
Compare all four images side by side. The bottle starts capped, the cap is removed and placed on the table, and the bottle stays uncapped in the final shot; the light direction, liquid color, label, and bottle-to-hand proportions should stay consistent.
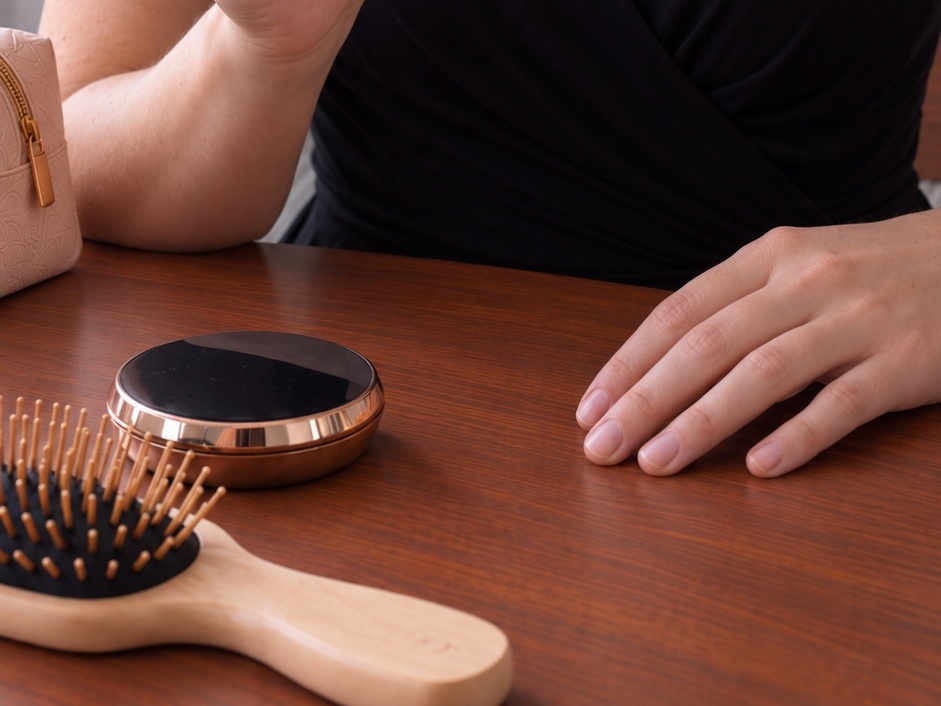
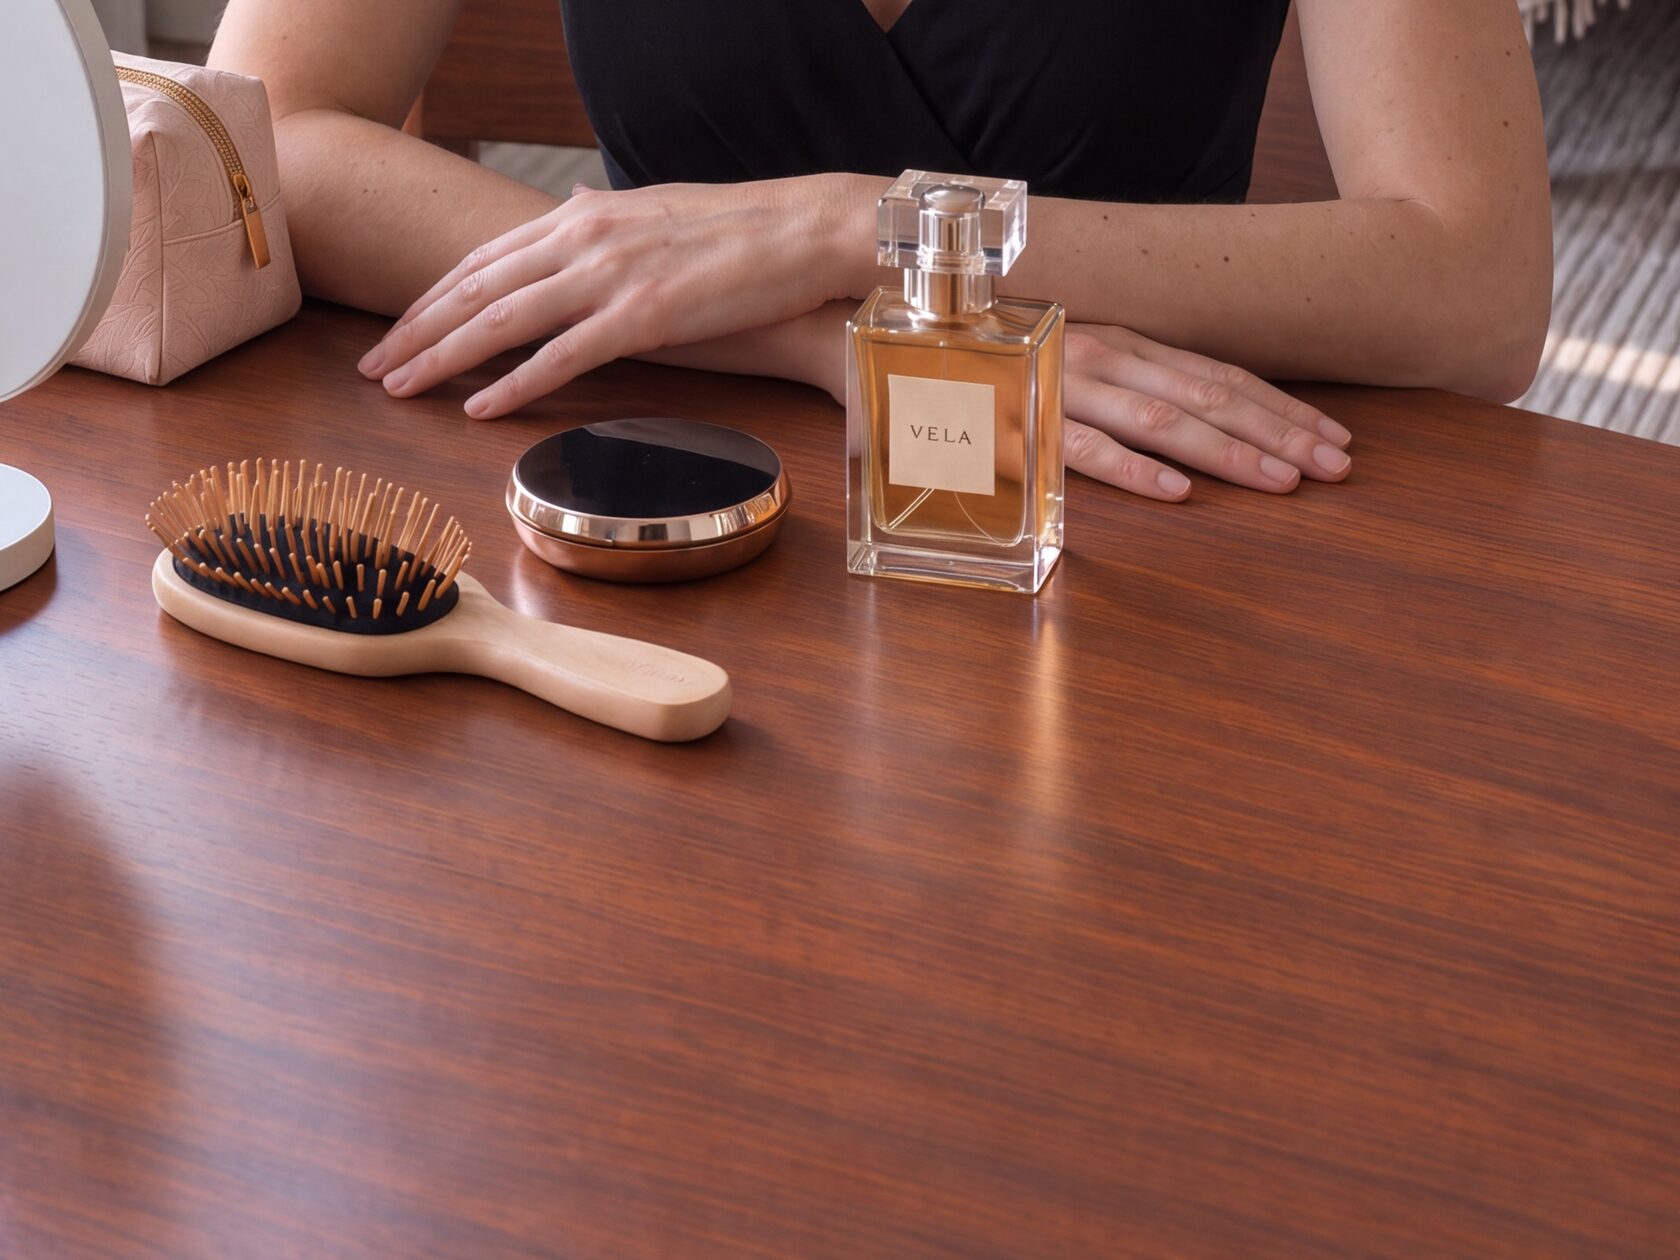
Oversized brush and compact in an early image, compared with the accepted prop scale.
A product insert does not need to show the whole table. Tighter framing can keep attention on the product and remove unnecessary background details, as long as the crop still shows the full action and does not cut awkwardly through the hand.
Step 4: Generate the Talking Scenes in HeyGen
Create a separate project folder in HeyGen. In the avatar section, choose the photo-based creation option and upload the main portrait for the first version, where the bottle sits on the table; then add the image where the same character holds the uncapped bottle. The interface may call these versions “looks.”
Create a vertical 9:16 video project with two talking scenes. Assign the table-bottle avatar to the first scene and paste scene 1's script from the table; assign the held-bottle look to the second and paste scene 4's script. Enter text here—the connected ElevenLabs integration will generate the speech.
With this setup, the avatar does not need to pick up the product, remove the cap, and spray while speaking. Those actions are handled by separate product inserts.
Choose One Voice for the Whole Ad
For VELA, I used Sarah — Casual & Modern, an American-accented voice from the ElevenLabs voice library. You can choose a library voice that suits the character or create your own voice from a recording.
To import a voice, open HeyGen's voice settings, add a new voice, and choose the third-party integration option. Select ElevenLabs and connect your own API key, then use the imported voice for both looks. The integration consumes ElevenLabs credits. Follow the official connection instructions for the current interface.
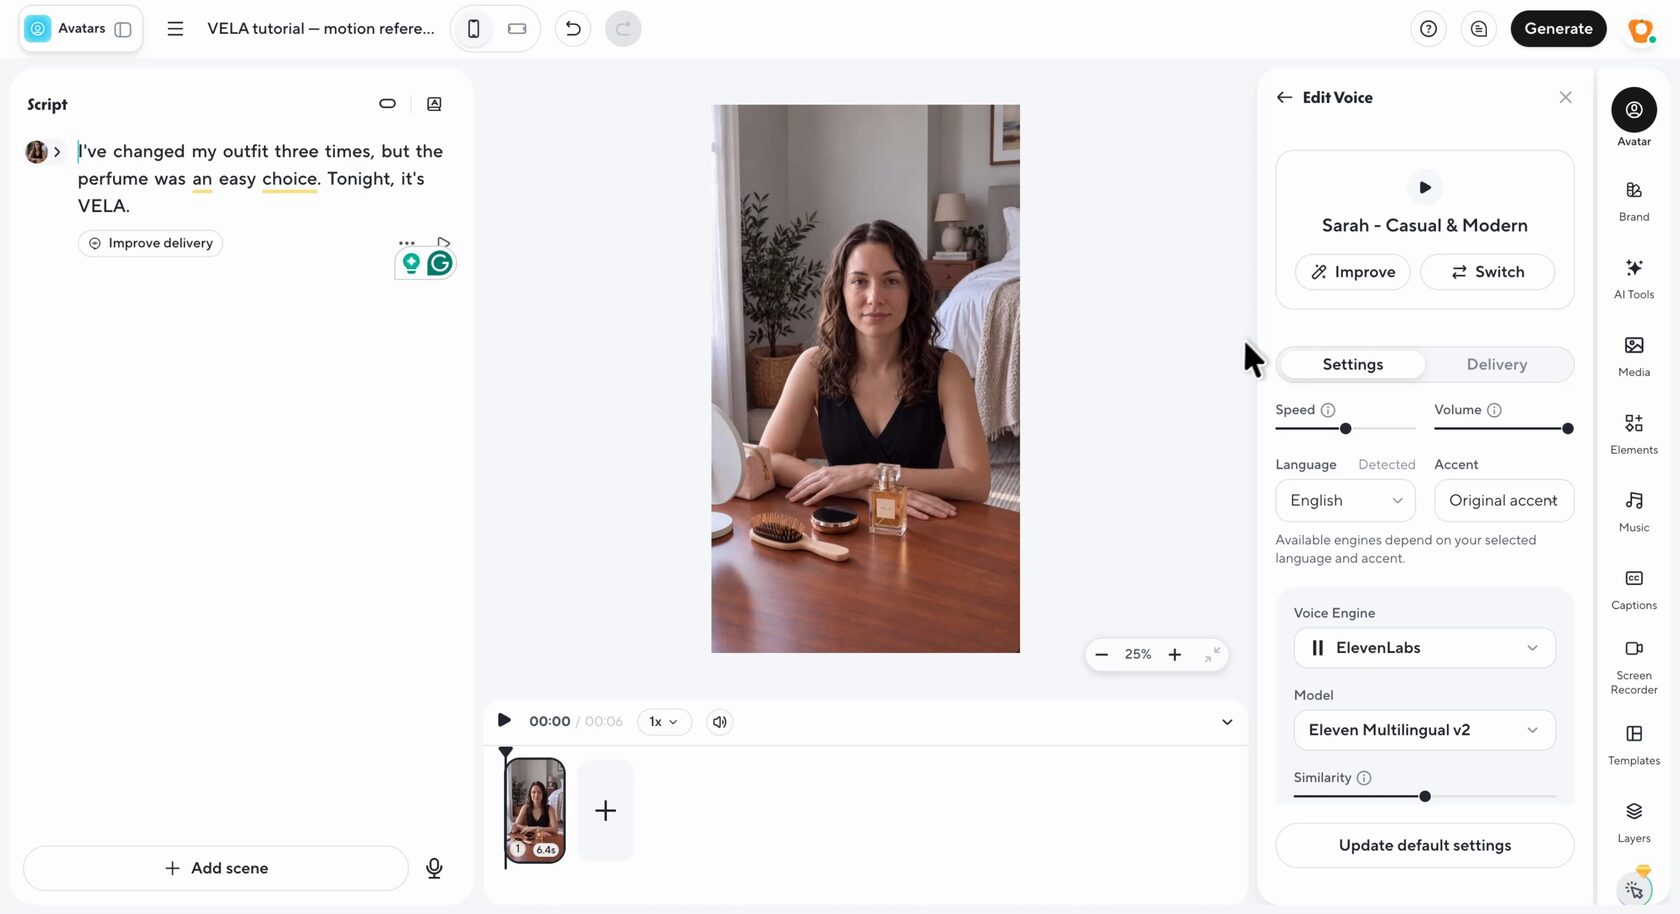
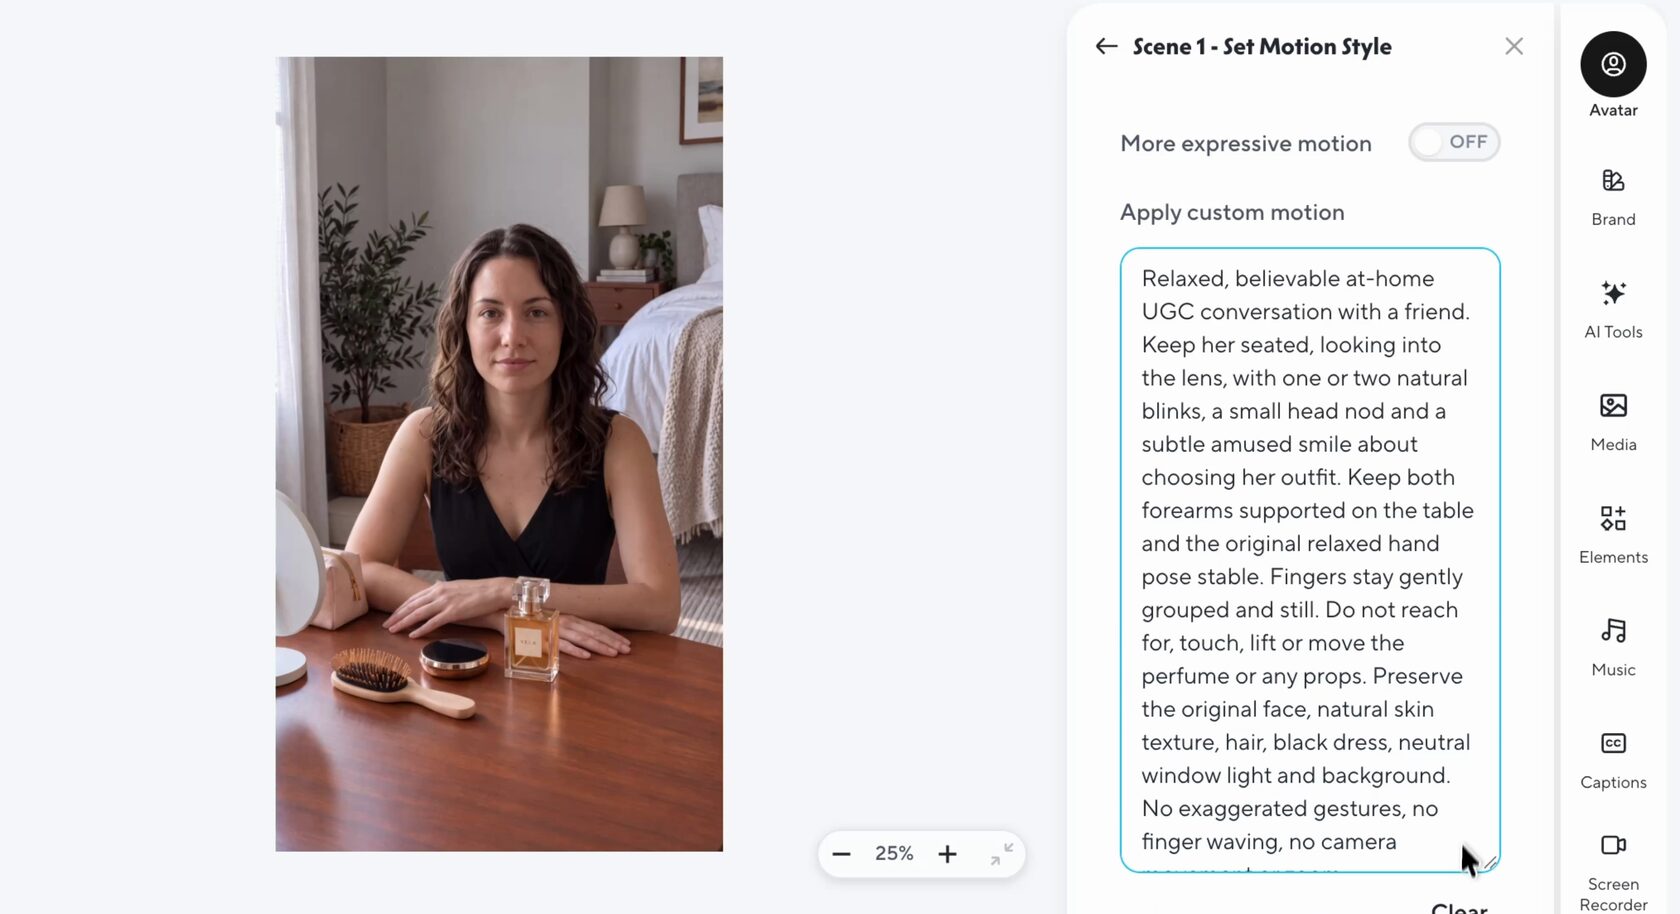
The Sarah voice and restrained character motion in HeyGen.
Listen to a complete short line before generating the full ad. Natural sentence-level delivery matters more than maximum speed; splitting the script into many tiny clips can introduce noticeable changes in pace and tone.
Keep the Motion Simple and Test a Short Line
This project used Avatar 6 Pro Beta with More Expressive Motion switched off. The engines available in your account may differ, so test a short clip using the intended photo, voice, and motion settings before generating the remaining lines.
Example motion instructions for the opening shot:
Read prompt
Relaxed, believable at-home UGC conversation with a friend. Keep her seated, looking into the lens, with natural blinks, a small head nod and a subtle amused smile about choosing her outfit. Keep both forearms supported on the table and the original relaxed hand pose stable. Fingers stay gently grouped. Do not reach for, touch, lift or move the perfume or any props. Preserve the original face, natural skin texture, hair, dress, neutral window light and background.For the held-bottle look, replace the instruction about both forearms resting on the table. Instead, ask the avatar to preserve its existing grip without pressing the atomizer or moving individual fingers around the bottle; motion instructions should match what is already visible in the photo.
Export the talking scenes in 4K if your plan supports it. Check more than lip movement: watch the blinking, teeth, hairline, and hands throughout the full line, including any pauses.
Step 5: Animate the Product Shots with Veo
You now need two source images: the wrist-spray setup and the bottle close-up. In ElevenLabs, open video generation, choose Veo 3.1 Lite, and add the relevant image as the starting frame.
Before generating, set the aspect ratio, duration, and audio option in the generator controls: 9:16, 4 seconds, and audio off for these inserts. Writing those values in the prompt does not necessarily change the settings; check the displayed credit estimate after selecting the options.
Choose a resolution offered by your interface: this project produced 1080p files, while the current ElevenLabs guide lists 720p for Lite and Google's model description also lists 1080p. Check the available options rather than assuming every provider exposes the same settings. See the ElevenLabs guide and Google's Veo 3.1 Lite description.
Spraying Perfume on the Wrist
The finished example shows two presses. This template is adapted to that visible action; it does not guarantee an exact number of movements in every generation.
Read prompt
Animate the approved VELA perfume wrist-spray reference. Vertical 9:16, 4 seconds, silent. Keep the same woman, hands, uncapped perfume bottle, label, table, background and lighting. Fixed camera.

Her index finger makes TWO short, controlled presses of the atomizer. Each press releases a small, fine burst of transparent perfume mist aimed toward the inside of her opposite wrist. Mist emerges only from the nozzle and dissipates naturally after each press. Keep the other fingers relaxed and in the same grip. Preserve hand anatomy, bottle geometry, label placement and realistic scale. No exaggerated finger motion, thick smoke, extra hands, camera shake or added actions.The original wrist-spray reference and its animation. Mist is already visible in this project reference; the still-image template above creates a fresh pre-press pose.
The prompt establishes the scene and camera first, then describes one action. That is enough for a first ad: adding cap removal, a bottle turn, and a grip change to the same four-second clip creates more interactions to check and may require more attempts.
Showing the Bottle Up Close
This insert is about the packaging, so the hand does not need to perform a complex action. A slow camera push-in and a tiny wrist movement add motion while keeping the label visible.
Read prompt
Animate the approved close-up of the uncapped VELA perfume bottle in the woman's anatomical right hand. Vertical 9:16, 4 seconds, silent. Use a very slow, smooth camera push-in of about 5 percent over the shot.

Her wrist and bottle move together by a tiny natural amount, less than two degrees. All fingers maintain their initial position and stable side grip. The index finger stays beside the glass, away from the pump. Keep the bottle upright, label facing camera and readable, with the same glass silhouette, silver atomizer and amber liquid. No cap, spray, pressing, finger flutter, twisting, grip changes or new objects. Same neutral daylight and softly blurred black dress. Face and mouth stay outside the frame. No scene changes or rack focus.The accepted bottle close-up and a rejected take with excessive finger movement.
Even a precise prompt can produce unwanted motion. Watch the clip at normal speed and slowly: fingers should not pass through the glass, the label should not slide across the bottle, and the mist should come from the nozzle. If the starting grip already looks awkward, fix the still before spending more attempts animating it.
Step 6: Add Product Voiceover Using the Same Voice
Select the same Sarah voice in ElevenLabs that you connected to HeyGen, then generate one continuous passage for both product inserts. The separate voiceover in this project used Eleven Multilingual v2:
Read prompt
A little on my wrist, and I'm almost ready to go. It starts with pear and bergamot, then settles into a warmer cedar note.The Sarah voiceover used for the two product shots.
Compare it with the avatar's speech before editing: the voice, pronunciation of VELA, and delivery should feel consistent. Using the same voice does not automatically produce matching loudness or intonation, so listen across the transitions between files.
Step 7: Assemble the Ad in Canva or CapCut
Keep five files ready for the edit: two talking clips, two silent product clips, and one product-voiceover file. If HeyGen exports both talking scenes together, split them in the editor so the product shots can sit between them.
Arrange the four scenes in storyboard order and place the voiceover beneath the product shots. Fit the visuals to the speech: you do not need to use an entire four-second generation if the useful action and line finish sooner.
Editing the four scenes, voiceover, and quiet background music.
The main editing technique here is a change of shot. The medium view cuts to the wrist, then the packaging, and returns to the character; the viewer reads these as consecutive moments in one story. A clean straight cut suits this short UGC-style example better than an effect that competes with the product.
Remove empty tails, but preserve natural breathing and short pauses within the delivery. Keep instrumental music clearly below the speech, and align any added spray sound with the visible press.
Before exporting, watch the entire ad and check that:
- Speech starts and ends cleanly, with no accidental silence between scenes.
- The bottle, cap, clothing, and lighting remain consistent across the edit.
- Images are not stretched, and the hands, product, and captions are not awkwardly cropped.
- There are no stray frames, flickering overlays, or sudden changes in loudness.
- The label stays readable, and product inserts do not linger just to fill the generated clip's duration.
The finished example is 1080×1920. A high-resolution portrait and talking-scene exports give you useful detail and cropping flexibility, but they do not make lower-resolution product inserts native 4K.
What Makes AI Video Look Unrealistic?
Check how the scene behaves in motion, as well as how an individual frame looks. A convincing still can become an unnatural video when object shapes, hand contact, or light direction change during the shot.
| What to check | How a problem may appear | What helps |
|---|---|---|
| Skin, hair, and facial detail | Waxy skin, excessive shine, repeated pore patterns, or clumped hair | Neutral lighting, restrained retouching, and detail without aggressive sharpening; inspect a close crop before animating |
| Gaze, expression, and speech | Frozen eyes, unnatural blinking, changing teeth, or lips that do not match the audio | A short avatar test with the intended voice; restrained expression and a review of the whole line, including pauses |
| Anatomy and object interaction | Extra fingers, distorted joints, a hand passing through an object, or an unexplained grip change | A clear starting pose, stable contact, and one main action per clip; fix incorrect anatomy in the source still |
| Product shape and scale | Packaging changes size, lettering distorts, or the material looks different | One clear product reference; compare the silhouette, label, and dimensions relative to the person and setting |
| Spatial geometry and props | Objects grow, float, move position, or overlap incorrectly | A shared scene reference, believable perspective, and a side-by-side check of object placement in the keyframes |
| Lighting, shadows, and reflections | Shadows move separately from objects, the face and setting have different lighting, or reflections do not match | A consistent light direction and simple lighting setup; inspect reflective surfaces |
| Motion and physical consistency | Objects bend, movement accelerates abruptly, or details flicker and change | Restrained motion, a clearly defined action, and enough time for it to happen; review at normal speed and frame by frame |
| Continuity and sound | Appearance, clothing, product state, voice tone, or loudness change between shots | A connected storyboard, a common character reference, one voice, and a review of the assembled transitions |
Fix the problem at the stage where it began: an incorrect product shape in the still, unwanted motion in the animation, or uneven loudness in the edit. That prevents one local defect from forcing a complete restart.
If you need more control over the packaging, material, or label, use these product photography prompts to prepare a clearer reference.
How Much Does an AI UGC Ad Cost, Including Failed Takes?
The accepted 4K source photo, two HeyGen talking clips, two Veo product clips, and product voiceover used about $1.33 in credits. Adding the character and lighting tests below, plus one rejected close-up retry, brings this production subtotal to about $2.78.
The calculation uses 10,000 ElevenLabs credits = $2 and 1,000 HeyGen credits = $49.
| Production stage | ElevenLabs credits | HeyGen credits | Credit value |
|---|---|---|---|
| Accepted 4K source photo — Nano Banana 2 | ≈1,144 | 0 | ≈$0.23 |
| Two final talking scenes — HeyGen | 0 | 12 | ≈$0.59 |
| Two final product animations — Veo | 2,424 | 0 | ≈$0.48 |
| Product voiceover — ElevenLabs | 122 | 0 | ≈$0.02 |
| Accepted assets subtotal | ≈3,690 | 12 | ≈$1.33 |
| Testing: character and lighting variations, plus one rejected close-up | ≈6,271 | 4 | ≈$1.45 |
| Accepted assets + listed tests | ≈9,960 | 16 | ≈$2.78 |
For a similar short ad, roughly $2–3 is a useful reference for this scope. Longer talking scenes, more complex actions, or additional retries can increase the cost. Approve the still images first, test a short talking scene, and keep the product action simple before spending credits on longer clips.
Where You Can Use This Workflow
You can adapt this process for beauty products, accessories, home goods, and other items that benefit from a short demonstration. Start with one situation and four clear shots, then add new angles, alternative openings, or a longer explanation while keeping the same character references, voice, and quality checks.
The technique is useful for developing product videos and ad variations, but a finished video is still a creative to test. Its appearance alone does not establish that it will sell a product or outperform footage from a real creator.
Tools Used in This Tutorial
This section contains GrowUnit Labs affiliate links.
HeyGen
HeyGen turns a prepared character photo and script into a talking scene. In this workflow, it handles speech and facial expression, while the more involved product actions appear in separate inserts.
Try HeyGenElevenLabs
ElevenLabs brings several stages together: prepare an image with Nano Banana, animate a product shot with Veo, and generate the voiceover. You can use the same selected voice directly in ElevenLabs and through its HeyGen integration; model availability, cost, and export quality depend on the settings and plan you use.
Try ElevenLabsYou can find more content tools in the GrowUnit tools directory.